Wednesday, December 19, 2012

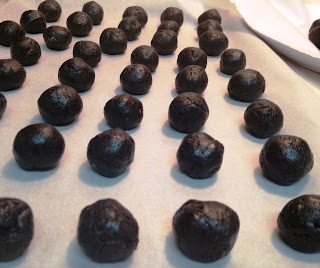
Oreo Truffle Reindeer Noses

It is that time of year where baked goodies are given and received, and where for a few weeks we turn a blind eye to the calorific content of everything...that is until new year resolutions come into play.  Like my fellow co-workers, I like to bring home-made sweets for the office.  Not only is it simple and fun for me to make, but most importantly it is safe on a student's pocket book!

This year, I finally caved in and made everyone's favorite (including mine): the Oreo truffle.  My friends insisted on how easy these are to make and with merely three ingredients, I could not agree more!  That is, after I tackled a slight problem with the Oreos and the blender.  Despite this slight set back, they taste delicious and are a quick and easy gift for everyone on your Christmas list!


Ingredients

1 package Oreos
1 8oz bar cream cheese
Almond bark chocolate

Directions

1. Place Oreos in a large Zip-loc bag and smash with a rolling pin until they are fine crumbles.


2. Add cream cheese and mix well.  Although a little messy, it is much easier to mix with your fingertips.
3. Roll mixture into balls, approximately 3/4 - 1 inch in diameter.
4. Place balls on a baking sheet covered in parchment paper and refrigerate for 2 1/2 - 3 hours to harden.


5. Remove from fridge and melt almond bark chocolate in microwave according to manufacturer's directions (3 large squares will cover approximately 20-25 balls).
6. Using a fork, dip each ball into the chocolate, ensuring full and even coverage.  Place ball back on parchment paper to dry, using a toothpick to remove the fork from the ball.
7. Top the balls with sprinkles, crushed Oreos, or nuts to add variety.
8. Allow balls to dry for at least 1 hour.  Place in cellophane bags with a holiday label and enjoy!
(Recipe adapted from cookingwithk.net)
 
Yields approx. 45 balls


TIPS

- I was told to use a blender to crush the Oreos, however I found that they got stuck at the bottom and caused the processor to become hot.  Thus, the old fashioned bag and rolling pin works great!
- When smashing the Oreos, do not place all of the cookies in the Zip-loc bag at one time.  Instead, add 1/3 of the cookies to the bag at each time to ensure fine crumbles.
- Allow cream cheese to soften before trying to mix it with the Oreos by removing from fridge 1 hour prior to using.
- White or brown chocolate may be used.  I used mostly brown, however I made 15 Rudolph noses by adding 8 drops of red food coloring to the white chocolate.

Bon appétit!

Wednesday, December 12, 2012

Egg, Bacon, and Cheese Breakfast Ring

Looking for the perfect breakfast that will please the whole family?  Look no further!  This easy and delicious start to the day will be a great hit on Christmas morning with all ages!


Ingredients

1 can crescent rolls
5 eggs
1/4-1/2 cup cheese, shredded
6 slices bacon
Parchment paper

Directions

1. Cook bacon according to manufacturor's directions.
2. Scramble eggs.
3. On a pizza pan covered in parchment paper, lay the crescent rolls in a star formation.
4. Place cooked bacon in a circle around the center of the ring.
5. Place half of the scrambled eggs on top of the bacon, add half of the shredded cheese.
6. Add the remaining scrambled eggs and cheese.  Top with salt and pepper to taste.
7. Fold the pointed tips of the crescent rolls into the center, pressing all of the points and sides together with fingertips.
8. Bake at 375F for 15-20 minutes or until crescent rolls are slightly brown.


9. Enjoy with hashbrowns and a glass of orange juice (or mimosa)!!
(Recipe adapted from: navywifecook.com)

Serves 4-5 people

TIPS

- Replace bacon with sausage meat or add hot sauce for an extra tang!


Bon appétit!

Saturday, December 1, 2012

Thanksgiving: Cauliflower Soup & Cranberry-Almond Crumble

Happy belated Thanksgiving!  I hosted my very first Thanksgiving this year, and thankfully everything turned out perfectly!  I have decided not to post about the turkey and all the trimmings as everybody already knows how to cook their favorite delights, so I am going to share my appetizer and dessert recipes.  These are both incredible easy and of course delicious, and are sure to add a little variety to your next Thanksgiving, or even a casual family dinner.


Ingredients for cauliflower soup

1 tbsp extra virgin olive oil (EVOO)
1 clove garlic, pressed
1 Granny Smith apple, peeled and chopped
1/2 onion, chopped
1/2 head cauliflower, cut into 1/2-1 inch florets
3 cups chicken broth
1/4 cup chopped almonds
Pinch of oregano

Directions

1. Heat EVOO in a large pot over medium heat.
2. Add onion and garlic and heat for 5 minutes, or until soft.
3. Add cauliflower, apple, and almonds, stirring constantly for 2 minutes.
4. Add broth and oregano, bringing mixture to a boil.
5. Cover pot and allow to simmer over low heat for 45 minutes.
6. Puree soup and serve with freshly ground pepper and a piece of artisan bread.
(Recipe adapted from foodandwine.com)

Serves 4 people

TIPS

- I was a little skeptical about the cauliflower soup, but it is far tastier than one may think!
- The original recipe calls for leeks, however the grocery store did not have any at the time, so I substituted with an onion.


Ingredients for cranberry-almond crumble

6 oz flour
3 oz butter, room temperature
2 oz sugar, plus 1 tbsp extra
Pinch salt
1 Granny Smith apple, peeled and sliced
1 Honeycrisp apple, peeled and sliced
1 pear, peeled and sliced
6 oz fresh cranberries
1/4 cup chopped almonds
1-1 1/2 cups water

Directions

1. Place cranberries and water in small saucepan.  Cover saucepan and cook on medium heat for 5-10 minutes until soft and most of the water has evaporated.
2. Place flour in large bowl.  Cut butter into small pieces and add to flour.
3. Use the rubbing method: Rub mixture between fingertips until the mixture is crumbly with no large clumps.  Add sugar and salt, mix well.
4. Wash, peel, and slice apples and pear.  Lightly grease a 8x8 Pyrex dish, and evenly layer the fruit in the bottom.
5. Evenly place almonds and cranberries on top of the fruit.  Sprinkle 1 tbsp sugar on cranberries.
6. Top with crumble mixture and place in oven at 375F for 20 minutes, or until crumble is a light brown color.


7. Remove from oven and enjoy warm or cold with vanilla ice cream or plain yogurt.

Serves approx. 10 people

TIPS

- In the first step, cranberries should only just be covered, they should not be swimming in the water.
- Additional sugar is sprinkled on the cranberries to offset their tartness.
- Leftovers store well in the fridge in a covered container.

Bon appétit!

Monday, November 19, 2012

Tilapia and Rice with Oven Roasted Vegetables and Baked Apples

It's getting colder, the leaves are changing colors, and Thanksgiving is upon us!  So I thought I should start by getting into the autumn mood for dinner.  Now, I am unsure if tilapia actually counts as an autumn food, but at least my dessert did!  Both dinner and dessert were fairly quick and easy, so dinner was ready in no time at all.


Ingredients for tilapia

2 fillets tilapia
4 oz brown rice
4 tsp extra virgin olive oil (EVOO)
1 tsp cumin
2 tsp crumbled blue cheese
1 stick celery, sliced
1 carrot, sliced
1/2 bell pepper, sliced
1/4 onion, sliced
1/2 sweet potato, sliced
1/3 cup peanuts
Splash lemon juice

Directions

1. Cook brown rice according to manufacturer directions.
2. Wash and slice vegetables and place in roasting dish along with peanuts and 2 tsp EVOO.
3. Cook vegetables at 400F for 20-25 minutes.
4. 5 minutes before rice and vegetables are to be cooked, heat 2 tsp EVOO in pan.
5. Sprinkle cumin, salt, and pepper over tilapia.
6. Place tilapia in pan and cook for approximately 2 minutes or until opaque on both sides.  Splash a little lemon juice over fish halfway through cooking.
7. Divide rice and vegetables and top with fish.
8. Enjoy with a well deserved glass of wine!
(Recipe adapted from marthastewart.com)

Serves 2 people

TIPS

- Use your favorite vegetables and herbs to season the tilapia. 


Ingredients for baked apples

2 apples, diced
1/2 tsp nutmeg
1/2 tsp cinnamon
1/2 tsp brown sugar
Splash lemon juice


Directions

1. Wash and dice your favorite apples and place in pyrex dish. 
2. Add remaining ingredients to apples and toss well.
3. Place in oven at 375F for approximately 20-25 minutes until soft and juicy.
4. Enjoy this perfect autumn dessert alone, with ice cream, or with yogurt.
(Recipe adapted from PBS.org)
Serves 2 people


TIPS

- PBS also suggested eating the apples as a side dish with roast beef.

Bon appétit!

Saturday, November 10, 2012

Bailey's Irish Cream No Bake Cheesecake

Nothing gets much better than the words: Bailey's Irish Cream, cheesecake, and 5 minutes!  This fast dessert is a great idea for pot luck parties!


Ingredients

12 muffin cases
12 plain cookies
8 oz cream cheese
7 oz ricotta cheese
1/3 cup Bailey's Irish Cream plus 12 tsp extra
1/3 cup confectioners' sugar, sieved
36 blueberries

Directions

1. Place muffin cases in muffin tin.
2. Place cookies upside down in cases (bottom facing up).


3. Drizzle 1 tsp Bailey's Irish Cream on each cookie.
4. Place cream cheese, ricotta cheese, remaining Bailey's Irish Cream, and confectioners' sugar into bowl.  Mix until all ingredients are combined and the texture is fluffy.
5. Place mixture on top of cookis.
6. Put in fridge and serve within 1-2 hours.  Before serving, place 3 blueberries on top of each cheesecake.
7. Enjoy at a BBQ or afternoon tea!
(recipe adapted from thestonesoup.com)

Serves 12 people

TIPS

- The original recipe called for digestive biscuits, however these are hard to come by in the U.S.  I found that coconut macaroons work great!
- The cookies may be too large for the cases.  If this occurs, simply trim the edges of the cookie using a knife.
- Consume within one day as cookies become soggy from the Bailey's Irish Cream.

Bon Appétit!

Tuesday, October 30, 2012

Campfire Salmon with Veggies and S'mores

Last weekend I was taken on my first camping trip...ever!  Despite being pretty cold, it was thoroughly enjoyable hiking through four state parks in 24 hours.  Since I am new to living outside and sleeping in a tent, I was unsure of what an actual campfire meal is supposed to be.  However, I did very little complaining when I was informed we would be dining on salmon and wine.  Not bad if you ask me!  My first camping trip could not possibly be complete without the American tradition of s'mores!!


Ingredients for salmon

2 salmon fillets
Herbs: dill, parsley, oregano
1 tomato, chopped
1/2 head broccoli, chopped
1/2 bell pepper, chopped
1/4 red onion, chopped
Artisan bread

Directions

1. Liberally sprinkle herbs on each fillet and place in aluminum foil.  Pinch the sides of the foil together to enclose the fish.
2. Chop vegetables and place in aluminum tray.  Cover top with aluminum foil.
3. Place fish and vegetables on campfire for approximately 20 minutes or until fully cooked.


4. Remove food from aluminum and enjoy with a slice of artisan bread and a Solo cup of wine!

Serves 2 people

TIPS:

- If using dry ice to keep produce cool, be sure to cover the ice with a towel to prevent the food from freezing...not to name names as to whose fault this was ;)
- Since the food was slightly frozen, our cook time will be slightly longer in comparison.
- Use an assortment of herbs and vegetables of your choosing!

Ingredients for s'mores

4 graham crackers, halved
2 large marshmallows
8 squares of chocolate
Wire hanger

Directions

1. Break graham crackers in half (4 total pieces).
2. Place 2 squares of chocolate on each graham cracker.
3. Un-wind wire hanger and pierce marshmallow onto end of hanger.


4. Continually rotate marshmallow over fire for 1-2 minutes, or until marshmallow is a light brown color.
5. Remove marshmallow from hanger and place on top of chocolate.
6. Place other half of graham cracker and chocolate on top of marshmallow forming a graham cracker, chocolate, marshmallow, chocolate, graham cracker formation.
7. Enjoy the gooey, chocolaty dessert!
(first s'more picture from sunsetbayml.com)

Serves 2 people

TIPS:

- In an effort to be as health conscious as one can be with this dessert, we used dark chocolate.  However very tasty, dark chocolate does not melt as nicely as milk chocolate.
- If a greater chocolaty experience is desired, add additional squares of chocolate.

Bon appétit!

Tuesday, October 16, 2012

Ham and Cheese Quiche

Remember the fresh ham I baked and then froze into portions for later meals?? (see 17 August post)  Cooked ham or chicken is also great for a mountain of other dishes, including quiche.   I used a frozen pastry case, but you can make your own from scratch if you're a pastry cook.  I never realized how truly quick and easy a quiche is to make.  Simply add a healthy salad and a slice of crusty bread and dinner is ready!


Inredients

1 pie crust
6 eggs
1/4 cup cheese, shredded
1/4 cup ham, diced
2 slices onion, diced
2 spring onions, chopped
1 stick celery, chopped
3 slices red or green pepper, diced
Spices to taste ie parsley and basil
Salt and pepper to taste

Directions

1. Chop and dice all vegetables.  Cook in frying pan on medium heat for 5 minutes or until lightly brown.
2. Beat eggs in large bowl.  Add all other ingredients, including cooked vegetables.
3. Mix well and pour into pie crust.  Bake at 400F for 20-30 minutes or until set.

TIPS

- Pie crust takes about 30 minutes to defrost and can be found in the freezer section at your local grocery store.
- Add as little or as many vegetables as you wish. 
- For a little less cholesterol, substitute up to three eggs with 1/4 cup cholesterol-free liquid egg per egg.
- For an extra creamy quiche, add about 1/4 cup cream to the egg mixture.

Bon appétit!